|
|
|
|
Home →
Survival →
Flintknapping
Stone Tool Making
by Eric Heline
Here's a refresher for stone knappers and those of you who would like to get
away from blown glass and begin to make some real works of art with flint,
obsidian or other natural materials.
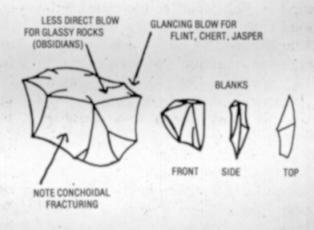
To begin with, determine a workable material by looking for conchoidal
fracturing. This means the material will fracture in an arc, forming a dished
(or domed) surface. Stones which fracture in straight line, or angular planes,
do not work as well and should be avoided to start with.
One of the best overall liths to work with is obsidian, in terms of ease of
flaking, sharpness (the sharpest), and great beauty. Obsidian comes in a wide
variety of colors: black is the commonest, sometimes translucent, ("Apache
tears" are obsidian-pebbles, polished by sand, wind and water). Red and
black, or "mahogany", is also fairly common.
Other varieties include grey (usually opaque) which tends to a bit harder to
work with. Snowflake, which is black with white "snowflake"
inclusions, tends to present problems with getting a proper edge, as the more
crystalline nature of the inclusions, they will flake or fracture differently
(almost crumble) from the surrounding black matrix of the obsidian proper.
Most varieties of obsidian can be purchased from rock shops in large enough
pieces or cores to get good blanks from. Since they are sold as lapidary
material, they are generally "sound" rocks.
Another excellent material is jasper which come sin a wide variety of colors,
combinations of colors, and hardnesses. It also has a glassy look, like
obsidian, but is not translucent. Don't confuse picture jasper with picture
stone. Picture stone is actually a sandstone, and will not have a glassy,
polished look to it when in an unworked, rough state.
Flint and chert, of course are the two most widely used materials of the
native Americans. They are basically of the same mineral composition, being
mostly fine grained quartz, the microscopic quartz crystals cemented together by
a matrix of "impurities". There are many varieties and colors of both,
flint being primarily black, translucent sometimes, or grey. Chert is used to
describe tan or white material. Chert will also have brown, yellow, red, or blue
colors too, the colors derived from other minerals within the matrix.
Flint and chert are very hard sedimentary rocks, and often need to be heat
treated before they can be worked. Heat treating is a rather involved process,
though simple enough to do. A good book which covers all the elements of flint
and chert and the heat treating of them is The Art of Flint Knapping, by
D. C. Waldorf.
Making the Tools
Step 1 - Direct Percussion
|
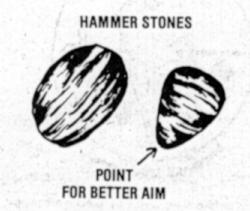
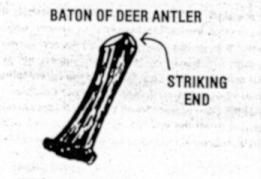
Step one is to get blanks off from the core. The first method is by direct percussion: striking the edge of the core with
a hammerstone (granite makes a good hammerstone) or a baton of deer antler.
Remember! A glancing blow to the edge. A direct blow will simply shatter the
core. With glassy-type rocks (obsidians) a very indirect glancing blow is used.
With the harder materials (jaspers, cherts and flints), a more direct, though
still glancing blow is needed.
|
 |
| |
|
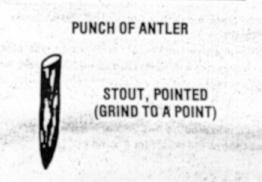
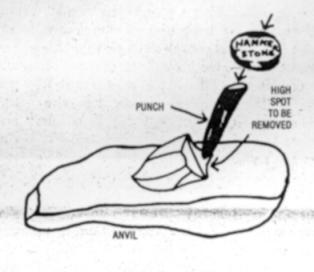
Step 2 -- Indirect percussion Indirect percussion, using an antler punch, now removes any unwanted knobs or
high spots on the blanks. An anvil or work surface is needed -- either a flat
piece of hardwood or a large rock. The blank is placed on the anvil and held
down with one hand, leaving the thumb and forefinger to hold the punch to the
area to be removed, and striking the end of the punch with the hammerstone.
|
 |
| |
|
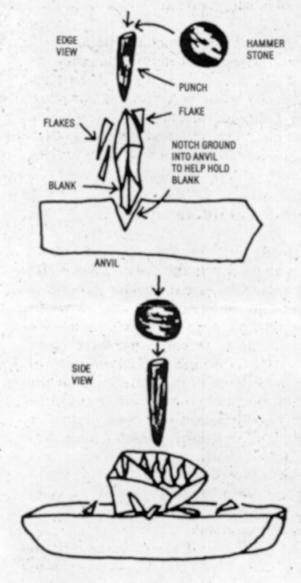
Step 3 -- Percussion Flaking Percussion flaking is now employed to thin the blank down. Holding the blank
on the anvil, the antler punch is placed on the edge of the blank or along one
side of any "squared" edge, then striking the punch with the
hammerstone, peeling large flakes off across the face of the blank.
|
 |
| |
|
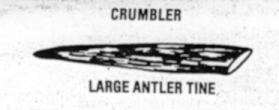
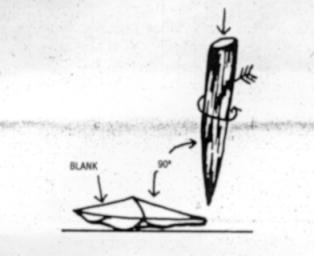
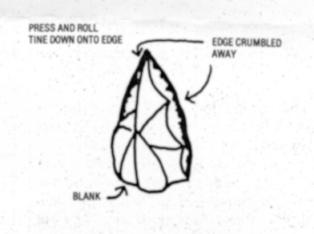
Step 4 -- Crumbling Crumbling now achieves the basic shape of the tool to be fashioned. Placing
the blank on the anvil, or now in the hand mitt, flat sides down, with a large
pointed antler tine held at a 90-degree angle to the edge desired, press down
with a rolling twist and crumble the edge away, working along the edge to get
the basic shape.
|
 |
| |
 |
| |
|
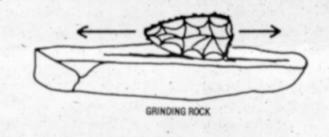
Step 5 -- Abrading Abrade (or grind) the edge (held at a 900 angle) upon a piece of hard
sandstone or other rock to get an even working surface, smoothing out the tough
spots from the crumbling process.
|
 |
| |
|
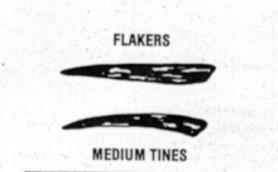
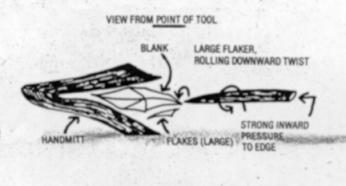
Step 6 -- Pressure Flaking Next, pressure flaking begins the actual process of producing an edge on the
shaped blank. Holding the lank in the handmitt, and starting out with a large
flaker of antler tine, press directly into the edge, and with a rolling,
downward motion peel flakes off across the face of the blank. The more pressure
exerted into the edge, the larger the flakes which will come off.
Remember, by placing the flaker on the edge, and rolling down, the flakes
will come off the underside of the blank as its held in the handmitt.
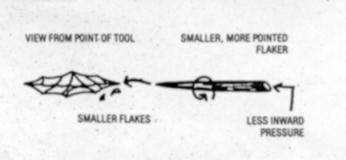
Work all along the edges and from both faces of the blank. Repeat the process
with smaller flakers as necessary depending on the size of the tool being made.
|
 |
| |
|
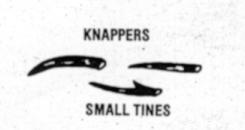
Step 7 -- Knapping The actual technique of knapping takes very small flakes off along the edge,
and produces the final razor sharpness.
Using very pointed, sometimes almost needlelike flakers of antler, remove the
flakes with the same inward pressure, and rolling downward twist as is used in
pressure flaking.
|
 |
| |
|
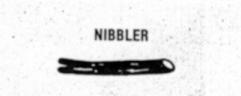
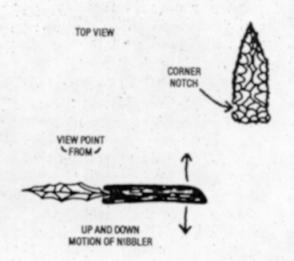
Step 8 -- Nibbling Nibblers are antler tines with a notch ground into the end, and are used to
crumble the notches into the bottom corners of the point, the notches, of
course, used to lash the point to the arrow shaft. Pressure flaking also works
to flake the notches.
|
 |
Tools of the Trade
|
From The Tracker magazine, Summer 1982,
published by the Tracker School.
For more articles from The Tracker magazine, visit the
Tracker Trail website. |
|
|
|
|
|
|
|
|