Materials needed: |
a) two square feet of rawhide
b) cedar board 3/4" thick by 4" wide by 4' long
c) willow or oak straight stick, 10" long by 1" diameter |
The wood can be cedar, willow, or cottonwood, which can be found at
most lumber yards. It must be clear of knots because these are weak spots in the lumber.
If there are a few small ones, increase the length of the lumber accordingly; the cuts for
the frame sides will be calculated to exclude these knots. The board must be between
7/8" and 1" thick by 3 1/2" to 4" wide. The length of the board will
be eight times the length of one side of the octagon, plus one inch to compensate for the
saw cuts. Do not forget to add length if any knots are to be excluded.
An example of the length of lumber needed for a drum with 4" long
sides is: 4" long times 8 sides equals 32" plus 1" for
saw cuts equals 33" of 1 x 4" cedar boards clear of knots.
If you know the diameter of the drum you want to make but do not know
the length to cut the sides, the following equations will help:
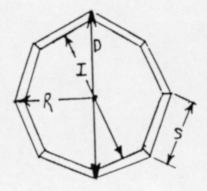
A = Total area of the octagon
I = Inside diameter
D = Outside diameter
S = Length of each side
R = Outside radius |
A = 4.828 x S2
I = 2.414 x S
S = .3825 x D
R = 2.614 x S |
|
Once the length of each side is determined, I set up the miter box saw
so that each side will be cut exactly the same length. I use either chalk marks on the saw
"fence" or I usually clamp the wooden block onto the fence so I will have no
variations of length to the side pieces. Remember, the 22 1/2 degree angle cuts must be
directed to a central point in the completed frame; therefore, the board must be rotated
180 degrees after each cut. Refer to the example below:
After all the cuts have been made, gluing and clamping the frame
together is begun. I have found that trying to clamp the glued frame with modern
carpenter's clamps is frustrating to the Point of making kindling wood out of the frame
sides. Two methods used by early Native Americans are the rawhide binding method and the
jig-wedge method.
When making one or two drums at a time, I use the rawhide binding
method. First I thoroughly glue all 16 corners, and work the glue into the wood fibers. I
set each side into the octagon configuration. By matching the corners together, I press
these corners against one another until the frame is in a completed octagon. The glue has
enough adhesion to hold the parts in place. At this time, I tie a piece of wet rawhide in
a loop with a slip knot (strong cordage can also be used). This loop goes around the
outside circumference of the frame; then I gently but firmly pull this tight until the
glue is extruding from the corners. I use the excess rawhide string and wrap it tightly
around the frame until I am sure the frame is locked solidly in place. (The rawhide will
dry faster than most glue and will keep the frame in place. Also, after the glue has
dried, the rawhide can easily be removed.)
If I am going to make many drums at one time which are the same size, I
use the jig-wedge method. I find that by setting the eight sides on edge in a loose
configuration of the finished frame, I can build a clamping box that matches the frame. I
use a piece of scrap plywood to set the unglued frame on, then I draw around it with a
pencil or pen to mark the size and shape of the frame. The more accurately this is done,
the easier the clamping and gluing can be done. After drawing the shape, I number each
piece with a corresponding number on the working surface of the plywood. At this time I
set them aside while I build the jig.
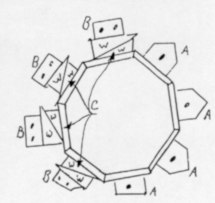
I have eight wooden wedges with a thin taper for locking the drum frame
in place. I nail four wood blocks on four sides of the frame outlined on the plywood. I
also nail four more wood blocks about one inch outside of the frame outline. I then glue
the corners of the frame pieces and place them at their corresponding locations on the
drawing. When they are in place, I insert the wedges and carefully increase the pressure
against the sides, while at the same time keeping the shape of the frame. Once locked into
place, the frame can be secured with rope or cordage and removed from the jig when the
glue has become tacky. If the frame needs extra strength, before removing from the jig,
the corners can be drilled and dowels or wood screws can be inserted. For clarification of
the jig-wedge method, refer to the illustration below.
A = First four brace blocks; use one nail
B = Second four brace blocks; use two nails
C = Wedges |
|
There are many types of glues that can be used. Native Americans used hoof glue,
pitches from certain trees, cattail leaf glue, and a hide glue. I have found that these
are difficult to make in any quantity, or my wife refuses to let me make them in her
kitchen. I use a glue that is waterproof, or at least water-resistant, because the rawhide
drum-head will be soaking wet while it is being strung. I have been using
"Wedgewood" water-resistant glue with good success. I have had poor results with
Elmer's glue because it is susceptible to moisture. I cannot emphasize too much the need
for a solid drum frame. If it is not absolutely solid, the drum tone will always rattle
and the sound will be ruined. The stronger the drum frame, the better the drum.
After the glue has dried and the frame is removed from its bindings,
it must be sanded and smoothed. Any sharp corners will cause undue stress on the hide when
it dries, and this stress can even cause a tear in the hide. A slight bevel is necessary
at the top of the frame, as illustrated below. Also, the corners must be slightly rounded.
This allows the hide to conform to the frame evenly and without gaps between the hide and
the frame. If a gap does occur, a severe rattle will develop in the drum tone.
Now begins another critical stage of constructing the drum. Select a piece of rawhide
that will completely cover the drum frame, with enough left over to partially or fully
cover the sides of the frame. Before I mark the hide for cutting, I select a piece of
rawhide that is free of nicks, skinning marks, and any defects. I also hold it up to the
light to more easily see variations in the thickness and any pinholes.
After a good piece of hide has been selected, I make sure it is wet enough to remain
pliable during the next hour and a half, Rawhide is very easy to work witty when it is wet
and pliable, and unbelievably difficult to manage when dry. If the climate is very dry,
the hide should be soaked for two hours; if the climate is damp, the hide may only need to
be soaked for half an hour.
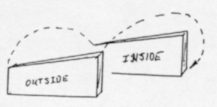
At this time, I lay the hide on a smooth, clean working surface with the smooth side of
the hide down. Every hide has a smooth and rough side. The smooth side should always face
out on the drum-head because that is the side the hair grew on, and also the side the
animal kept outside. Because the drum will be fashioned from the backside, the hide must
be placed on the working surface with the smooth side down.
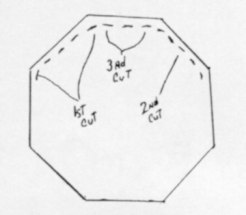
I try to smooth out any wrinkles in the hide, much like a seamstress lays out a section
of cloth before marking a cutting pattern. The frame is now placed on the hide with
no part closer than four inches from the edge of the hide. With the frame held in place, I
pull one section at a time that is adjacent to a frame side over the frame. When the hide
is over the frame edge, I mark the hide where it crosses over the frame edge. The easiest
way I have found to mark the hide is to scrape it with a knife along the inside frame
edge. This will leave a slight, light mark on the hide that can easily be seen when it is
again laid out flat.
After the eight individual sides have each been marked, I remove the frame and smooth
out the hide again. A faint, light-colored line should show the frame edges. I cut along
these lines with a knife, scissors, or a razor blade. When this is finished, I place this
drumhead in a cool, moist area until I have finished the next section.
Rawhide cordage is very easy to make and very easy to handle. It also allows all the
scraps to be put to good use. I begin making the cordage out of the smaller pieces; the
minimum size is about six inches square. I start at the outside of the piece and begin
cutting a continuous strip about 1/4 to 3/8 inches wide around the remnant until I reach
the center. A large quantity of rawhide cord is needed for each drum, so I try to use
every scrap of hide I can find. For instance, a drum one foot in diameter needs a minimum
of forty-five feet of cordage to complete drawing and binding of the drum. This cannot be
exactly measured because of the variation of hide thickness, moisture content, and the
amount of tension applied.
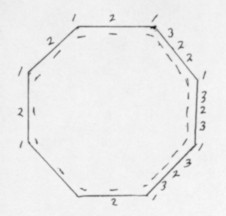
The next step is to cut a hole in the drum head hide at each of the eight
corners. The cuts should be about 3/4 to I inch inset from the edge and should be only
about 1/2 inch wide. If the cuts are too narrow, the cordage cannot be pulled through, and
if they are too wide or too close to the edge, the hide will tear. Between each of the
corner holes, cut another hole (total 16 holes). If the drum is smaller than eight inches
in diameter, this may be enough holes. For larger drums, I cut a hole between each of the
16 holes as shown below.
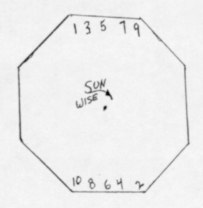
After all 32 holes have been cut, place the hide on the working surface,
again with the smooth side down, and set the frame on the hide. Cut an eyelet in one end
of a rawhide cord and push it through one of the corner holes. Thread the other end of the
cord through the eyelet and pull it tight., (See Illustration G for detail.) Using the end
of the cord like a needle, thread it through the hole cut in the opposite corner of the
hide and frame. Pull it snug (not tight). I bring it back over to the hole to the left of
the beginning hole and pull this section snug. I follow the pattern in a
"sun-wise" (clockwise) direction, as illustrated below.
Note:
This corresponds with the four directions described as the reason for four or eight sides;
because the sun travels across the sky from east to west, with the southern sky the midday
point, therefore clockwise or "sunwise". Tying the drum-head
"sun-wise" maintains the relationship to the four directions. |
 |
If the frame was properly centered and if the hide was cut correctly, the drum-head
will be evenly spaced as it crosses the frame edge. If any wrinkles or creases exist at
this time, I smooth them out while the hide is still very pliable.
Because the rawhide cordages are usually made from scrap material, it is difficult to
have one continuous piece of cordage. By cutting an eyelet in the first cord end and
another eyelet in the second new cord, I have been able to make a strong, locking
connection between the two sections. I push the second cord eyelet through the first cord
eyelet. I then thread the far end of the second cord through its eyelet as illustrated
below.
When the entire drum has been strung and I am satisfied with bow it lays on the frame,
I usually start pulling tension on the drum-head cords. I start at the first hole in the
stringing sequence and work my way around the hide in the same manner and direction as
that in which I originally strung the hide. The amount of tension necessary is directly
proportional to the moisture content in the air of the area where it will be kept or used.
If the drum is made in a low humidity area and stored in an area with high humidity, the
drum will sag and need to be restretched. Likewise, if you do the reverse, it will be too
tight to have a good tone and it will need a spray of water before it can be used. I
prefer about a I to 11/2 inch depression of the cords with a firm pressure applied to the
center of the hide.
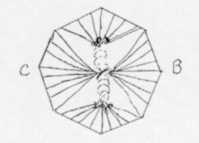
The final binding of the rawhide cords to form the handle is the next and final step.
Depending on the tribe or clan belief, the handle formed four, five, or six points. I
usually make a four-section handhold.
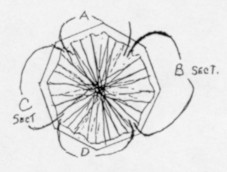
I first divide the crosshatch of cords into four equal groups. Use the example below as
a guide.
| |
|
I
bring the excess cord from the last hole in the hide over and down between sections A and
B. Then I bring the cord under the center and up between section C and section D. The cord
is then looped over section D, close to the center, and down again between sections D and
B; now under the center and back up between A and C sections. During this procedure, the
cordage must be pulled very tight. At this time, wrap the cordage over the A section cords
four or five times (preferably widely spaced). I try to bind/wrap the cords together about
half the distance from the center to the frame. |
 |
When I reach the halfway point, 1 select two or three cords on the outside of this
section and make one tight loop around them. Then I continue on to the next two or three
cords until I have bound the sections cords into three r four subsections. This gives
extra strength and a more intricate appearance to the finished drum.
After this I again loop the cordage around the handle part of section A that was
bound/wrapped. This time when I bind/wrap, I make sure the rawhide cordage is closely
wrapped all the way from the subsections. At the center, I carry the cordage over the
center and begin the same process of binding on section D.
When all the sections are completed, I make several wraps across and around the center
piece, at least two complete wraps and cross-patterns. I cut the remaining cordage off
after a place has been found to tuck the end into the handle. Sometimes the tip can be
tied off to a hold in a drum-head hide hole.
From The Tracker magazine, 1984,
published by the Tracker School.
For more articles from The Tracker magazine, visit the
Tracker Trail website. |