|
|
Home →
Survival →
Fire →
Handdrill
Floating Hand Drill Technique
Explained
|
| |
|
The Floating Hand Drill technique is a way of operating the
hand drill without having to stop after each stroke and move the hands
back to the top of the drill. With this
technique, the hands stay at one level on the drill at all times. An
expert in this method can even make their hands move UP the drill while
still applying downward pressure on the drill!
The following diagrams illustrate the core principle
of this technique. With thanks to
Rob Bicevskis
who taught me this technique and provided this explanation! |
|
|
|
|
|
|
|
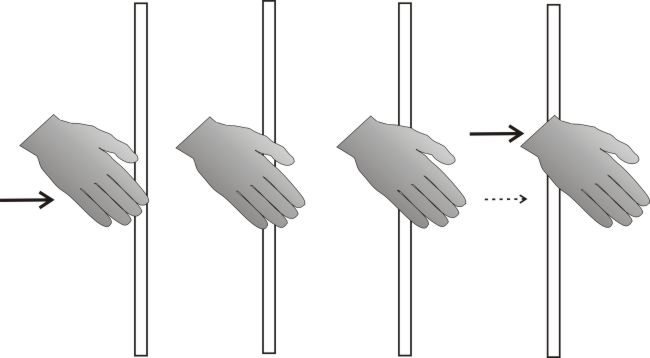
To properly understand this technique, lay your hand drill on the floor.
Take your right hand and place it on the drill as shown in the leftmost
drawing below. Using your right hand on the drill, roll the drill to the
right. Notice how the main point of contact of your hand on the drill
actually moves UP the drill as you roll it. This is shown in the
successive drawings from left to right below. The solid arrows show
the main point of contact at the start and end of the roll. The dashed
arrow on the rightmost drawing shows the difference between the starting
position and the ending position of the main point of contact (of
your hand and the drill). It has actually moved UP the drill. |
|
|
|
 |
|
|
|
|
|
|
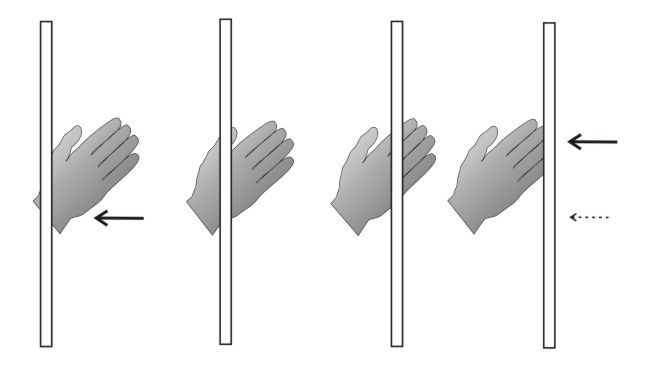
Similarly for your other (left) hand. In this case, lay your left hand on
the floor, palm up. Place the drill on your hand as shown in the
leftmost drawing. Roll the drill across your hand from left to right, as
shown in the drawings below. Again, note how the main point of contact
of your hand on the drill is actually moving UP the drill.
The solid arrows show the main point of contact at the start and end
of the roll. The dashed arrow on the rightmost drawing shows the
difference between the starting position and the ending position of the
main point of contact (of your hand and the drill). |
|
|
|
 |
|
|
|
|
|
|
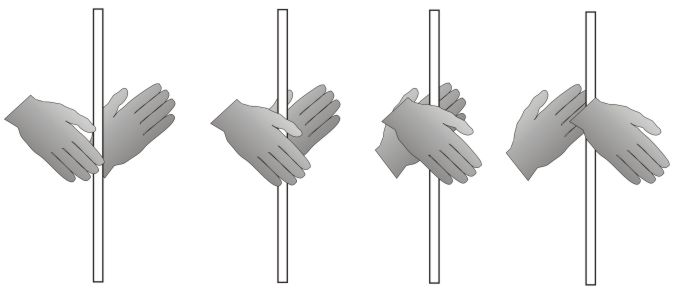
The two previous drawings, and the suggestion to lay the drill on the
floor, are only to illustrate how the technique works. Now, let's see
how this theory is applied... The next set of drawings show the combined effect of having BOTH hands on
the drill. In these drawings, the drill is now held upright.
Here, the right hand is on "top" and the left hand is
"underneath."
The right hand (on "top" of the drill) is moving forward from the
finger tips towards the arm, and the left hand ("underneath" the drill)
is moving backwards from the arm towards the fingertips.
Again, you can see that the net effect of the hand movements is to
raise the main point of contact of the hands on the drill UP the drill. |
|
|
|
 |
|
|
|
|
|
|
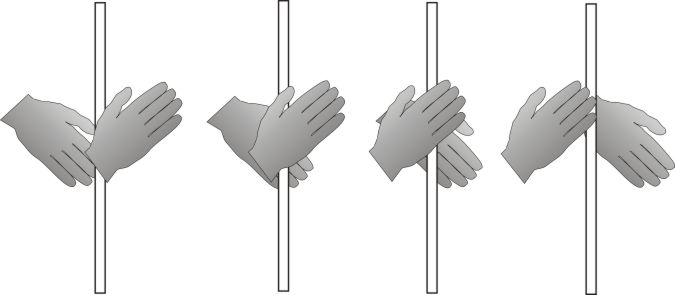
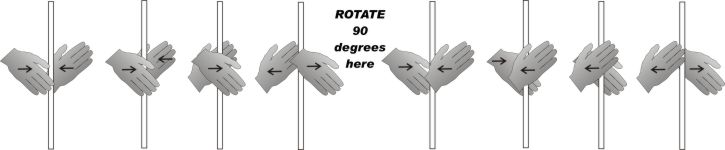
At the end of the stroke, simply rotate both hands 90 degrees (while
keeping them on the drill) and roll them back the opposite way. At the
end of this return stroke, again rotate your hands 90 degrees and do
another stroke. And so on. The following drawing illustrates the
return stroke. The hand on top (right hand) is moving from right to left
in this diagram, ie, from the arm towards the finger tips. Again, the
main point of contact moves UP the hand drill. |
|
|
|
 |
|
|
|
|
|
|
For each of the above drawings, it is noted that the main point of contact of
your hands on the drill moves upward with each stroke. This is good, because at
the same time you will be pushing down on the drill. Clasp your hands together
onto the drill with some pressure in order to push down and apply the necessary
pressure and therefore friction to the fireboard. In short, as you apply
downward pressure to the drill (which would cause your hands to move DOWN the
drill), the floating technique tends to move your hands UP the drill. The net
effect is to allow your hands to stay in more or less the same place on the
drill at all times!
Here is a drawing showing the whole sequence of two strokes. The small arrows
indicate the direction that each hand is moving. |
|
|
|
 |
|
|
|
GOOD LUCK! |
|
|
|
|

