|
|
|
Home →
Survival →
Fire →
Fire From Ice
|
|
|
Fire from Ice #3
Perfecting the Ice Lens
Photos and text by Rob Bicevskis
(Page 1 of 2) Fire from Ice #3: Page 1
Page 2 |
|
|
|
|
|
Some people spell it "lens" and some spell it "lense".
I'm going to use "lens". |
|
|
|
If you haven't already read my two previous articles on this
topic, Fire From Ice #1
& Fire From Ice #2,
have a look for some background. After having "played" with
ice lenses last winter, I decided to push a little deeper in
trying to perfect this form of fire-starting. These
are the things I looked at:
- Getting Clear Ice
- How a Lens works and the Properties of a Good Ice
Lens
- How to Predictably Make a Good Lens "in the field"
- How to Make an Almost Perfect Ice Lens
- Eureka - it was always staring me in the Face!
|
|
|
| Getting Clear Ice Obtaining clear ice
is almost as much of a challenge as making an ice lens!
It is interesting that ice "wants" to be clear. When water
molecules freeze, they like to form a regular crystal lattice.
Any air or impurities that aren't the same "shape" as the water
molecules are rejected. As ice forms, it will try very
hard to be pure and clear. At some point, when the
concentration of "other stuff" is high enough, the ice "just
can't take it anymore" and has no choice but to allow impurities
to get included. Have a look at an ice-cube in your
refrigerator. You will probably notice that the outside of
the cube is clear, and towards the centre it starts to get
cloudy. What happened is that the ice formed from the
"outside in." The outer part of the cube formed first.
As the ice grew, it pushed the impurities to the center - where
they finally froze.
|
|
|
|
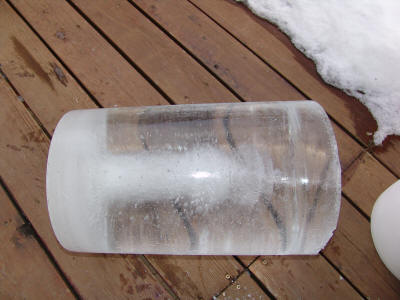 |
Here is a photo of the
ice that I got from pouring water into a large
bucket and letting it freeze. As with an ice
cube, you can see that the impurities got pushed to
the center. |
|
|
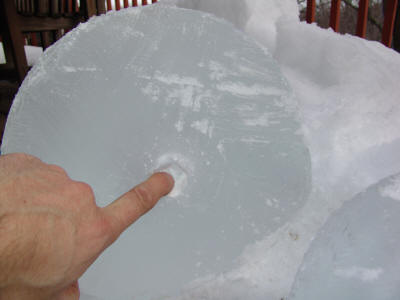 |
After sawing off the
top portion of the ice, there was a hole about an
inch in diameter in the centre. This is where
the dissolved air had been pushed. |
|
|
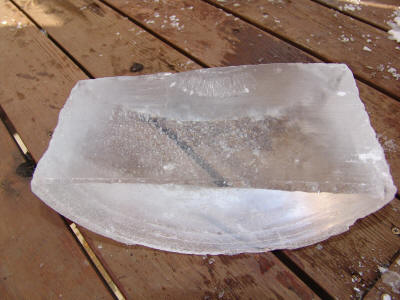 |
After a bit of sawing,
I had a "slab" of clear ice. |
|
Things that I learned about clear ice:
|
I have read that boiled water will freeze into
clear ice. Well, I tried: distilled water,
filtered water, boiled water and "vacuumed"
water. For the later, I put water into a
flask, hooked up a vacuum pump and held the
water at a vacuum to try to extract the air.
I then put all of the water samples in identical
containers and put them into the garage so they
would be exposed to the same temperatures.
All samples had the typical frozen entrained air
problem. Getting water with no dissolved
air isn't easy. (For me anyway.)
Some principles to follow for clear ice are as
follows:
- Try gradient cooling. If ice forms
"from one side" only, then it will push
the air to the "open" side.
- Cool slowly. If the water is cooled too
quickly, the ice doesn't have enough of a chance
to push the impurities ahead of the freezing
interface.
- Try to remove the air/impurities either
mechanically, or by dilution.
|
Apparently some ice makers use a cooled tray
that has water slowly flowing over it.
This embodies the above three principles.
The cold comes from one direction only - so
air/impurities are pushed upward. The
flowing water constantly carries away the
impurities. If the ice forms slowly
enough, no air is captured.
Think about why icicles are often clear - an
exercise left to the reader.
Another source of clear ice can be ponds and
lakes. One can be lucky enough to get
clear ice if the freezing conditions were right.
Another method that has worked for me involves
making a hole in pre-existing lake ice.
This makes a perfect environment for clear ice.
The "cold" is applied from only one side.
The air/impurities are pushed down into the lake
water and diluted and/or carried away. An
added bonus is that since ice is less dense than
water, the ice forms from the top down.
The technique is quite simple. Cut a hole
in the ice and wait. When you have a thick
enough piece of clear ice - remove it. (You
might want to add something to the outside of
the hole to make it easier to release the new
clear ice.)
|
|
|
|
|
How a Lens Works and the
Properties of a Good Ice Lens There are lots of good references
that explain optics and lenses in great detail, so I
won't try to to explain it poorly! It would however be useful to touch upon a few
things that are important for fire making.
|
Shape: Generally, people use "spherical"
lenses. Imagine a sphere that has its top
cut off. The cut-off piece is a spherical
lens. (Plano-Convex to be exact. One side
is flat - plano, the other curved outwardly -
convex.)
If we stick two plano-convex lens together, we
end up with a double-convex lens. This
would be the structure of a typical magnifying
glass.
| For those that are detail oriented, a
spherical lens does not actually focus all
light to a point. A parabolic lens would
do this. You can do a search on:
spherical, parabolic and also learn about "zones
of confusion." Also good if you ever
wanted to know how "depth of field" works on a
camera. But I digress... |
Focal Point and Magnification: For our
lens, we want to concentrate as much light on
as small a point as possible. This means
that we want a short focal point and hence we
will have high magnification. This implies
that the curvature of the lens must be
aggressive - i.e. very spherical. We
would also prefer a double-convex lens - since
this provide more magnification over a
plano-convex lens. (Most aggressive light
bending on the way in and on the way out.)
Index of Refraction: The index of
refraction is a number that corresponds to the
amount of bending that light will experience
when traveling from one medium to another.
The larger the differences in the refractive
index, the more bending we get. For us,
the more the light bends, the closer the focal
point and the higher the magnification.
Unfortunately, water and/or ice aren't the best
materials for lenses.
| Material |
Approximate Index of Refraction |
| Air |
Close to 1 |
| Glass |
1.5 to 1.9 |
| Water |
1.33 |
| Ice |
1.3 |
If we compare the indices of
refraction, we see that Ice has the smallest
number. Therefore, if we were to build two
lenses identical in size and shape, one made
from glass and one made from water, the lens
made of glass would have higher magnification
and would do a better job at starting a fire.
To make an ice lens with the same magnification
necessitates that we increase the curvature.
|
The conclusion - everything points to our ice
lens needing to have as much curvature as we can
give it in order to be effective. A "flat"
lens - even if it is big, has very little chance of
success. |
|
|
|
How to Predictably Make a Good
Lens "in the
field" When I tried to make lenses by hand,
even though I thought that I knew what a good
spherical lens looked like - I was usually wrong.
Since the lens we are trying to make has a
spherical shape, if we go back to math class, we can
define a sphere as a surface that is defined by a
constant radius. So, let's go build something
that does this in the bush! |
|
|
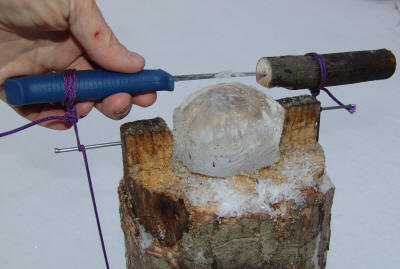 |
First I made a
draw-knife from a sheath knife and a piece of
branch. Next, I shaped the end of a log to
leave two "ears." I added a nail to each ear.
With some string, I had a setup as in the photo.
Image pulling the knife to the front of the picture.
It will follow a radius defined by the length of the
sting. The nails define an axis for our
"virtual" sphere. After each stroke of the knife,
the ice "blank" is rotated a few degrees and shaved
again. This process is continued until one has
a lens.
It is important to note that to take off more
ice, one needs to raise the ice. Do not
shorten the string. If the string is
shortened, then we have defined a new curvature.
Instead, place something under the ice. |
|
 |
This photo shows the
lens with one side done, and the other side
partially done. In this case, I used a glove to shim
up the lens. One could also use snow etc.
It is not necessary to have the same curvature on
both sides of the lens. |
|
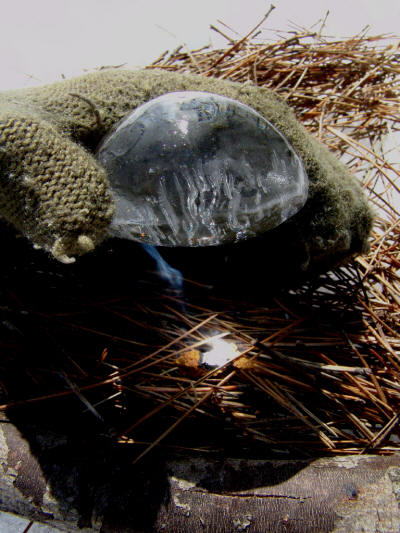 |
With a bit of bare hand polishing, I had my
lens.
This photo shows the lens lighting a piece of
tinder fungus.
It took only a second or two for the tinder to
light.
Success!
Note how aggressive a curvature was used on one
side of the lens.
Note also the fracturing that you can see in the
ice. On a warm day, the ice deteriorates
rather quickly. |
|
|
|
|
...on to
Page 2 |
|
|
|
|
|
|

